[FE / REACT] react-hook-form
서론...
프로젝트를 진행하면서 react-hook-form을 처음 접해보게 되었다
처음 들어본 라이브러리고
또 어떻게 사용하는지 몰랐는데
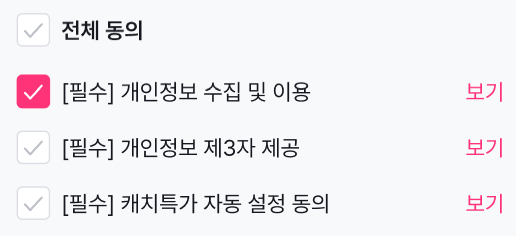
다른 팀원분이 사진과 같은 체크박스를 개발할 때 react-hook-form을 사용하면 개발할 때 훨씬 편리해진다고 하셨고
나 또한, 이러한 체크박스를 개발했어야 해서 공부하게 되었다!

react-hook-form이란
React에서 폼을 더 쉽게 다루기 위한 라이브러리이다.
공식 사이트는 아래와 같다.
React Hook Form - performant, flexible and extensible form library
Performant, flexible and extensible forms with easy-to-use validation.
react-hook-form.com
왜 쓰는지?
React에서 폼을 더 쉽게 다루기 위함...이라고 했는데 그 의미를 알고싶다!
1. 성능
기본적으로 React에서 onChage가 발생하면 매 입력마다 컴포넌트가 불필요하게 재렌더링 된다.
또한 useState를 사용해 상태 관리를 하는 것은 해당 상태와 연관된 컴포넌트 외에 다른 컴포넌트도 영향을 받아 재렌더링 된다
즉 불필요하게 렌더링이 되면서 성능 저하를 초래할 수 있는데!!
react-hook-form은 비제어 컴포넌트 방식으로 필요할 때만 렌더링을 발생시키도록 최적화 되어있다고 한다
이때, 비제어 컴포넌트 방식이란?
React에서 폼 데이터를 관리하는 방식 중 하나로, DOM 자체가 폼 데이터를 다루는 방식을 의미
(state를 사용해 입력 필드의 값을 관리하지 않고, DOM 자체의 내부 상태에 의존)
특징
1. DOM 자체가 출처
2. ref 를 사용해 접근(즉, state로 관리하지 않고 모두 입력이 된 후 ref를 통해 값을 한번에 가져와서 활용함)
3. 렌더링 사이클에 독립적
4. 기본값 설정
2. 간결한 코드
3. 유효성 검사
4. 타입스크립트 지원
5. 에러 핸들링
사용법!
'use client';
import React from 'react';
import { useForm } from 'react-hook-form';

const commonCheckStyle =
  "before:content[''] peer relative h-5 w-5 mr-2 cursor-pointer appearance-none rounded-md border border-blue-gray-200 transition-all before:absolute before:top-2/4 before:left-2/4 before:block before:h-12 before:w-12 before:-translate-y-2/4 before:-translate-x-2/4 before:rounded-full before:bg-blue-gray-500 before:opacity-0 before:transition-opacity checked:border-pink-500 checked:bg-pink-500 checked:before:bg-pink-500 hover:before:opacity-10";

const CheckboxContainer = () => {
  const { register, watch, handleSubmit, getValues, setValue } = useForm({
    defaultValues: {
      allAgree: false,
      checkbox1: false,
      checkbox2: false,
      checkbox3: false,
    },
  });

  const checkbox1 = watch('checkbox1');
  const checkbox2 = watch('checkbox2');
  const checkbox3 = watch('checkbox3');

  const allChecked = checkbox1 && checkbox2 && checkbox3;

  const onSubmit = () => {
    console.log('clicked');
  };

  const handleAllCheck = () => {
    const checked = !getValues('allAgree');
    setValue('checkbox1', checked);
    setValue('checkbox2', checked);
    setValue('checkbox3', checked);
  };

  return (
    <form
      onSubmit={handleSubmit(onSubmit)}
      className="flex flex-col w-full gap-4 "
    >
      <label className="flex items-center cursor-pointer relative">
        <input
          type="checkbox"
          {...register('allAgree')}
          onClick={handleAllCheck}
          className={commonCheckStyle}
        />
        <span className="font-semibold ">전체동의</span>
      </label>
      <label className="flex items-center cursor-pointer relative">
        <input
          type="checkbox"
          {...register('checkbox1')}
          className={commonCheckStyle}
        />
        [필수] 개인정보 수집 및 이용
        <span className="text-text-primary absolute right-0">보기</span>
      </label>
      <label className="flex items-center cursor-pointer relative">
        <input
          type="checkbox"
          {...register('checkbox2')}
          className={commonCheckStyle}
        />
        [필수] 개인정보 제3자 정보
        <span className="text-text-primary absolute right-0">보기</span>
      </label>
      <label className="flex items-center cursor-pointer relative">
        <input
          type="checkbox"
          {...register('checkbox3')}
          className={commonCheckStyle}
        />
        [필수] 개인(신용)정보 처리
        <span className="text-text-primary absolute right-0">보기</span>
      </label>
      <button
        type="submit"
        disabled={!allChecked}
        className={`w-full px-4 rounded h-11 mt-5 cursor-pointer ${
          allChecked
            ? 'bg-action-primary text-white'
            : 'bg-action-secondary-disabled text-text-disabled'
        }`}
      >
        다음
      </button>
    </form>
  );
};

export default CheckboxContainer;
- 'useForm' 훅 : 폼의 필드를 등록하고, 폼 제출을 관리함. Default로 value값을 설정해 둘 수 있음
- 'register' : 필드를 react-hook-form에 등록해 유효성 검사, 에러, 폼 데이터를 관리할 수 있게함
- 'handleSummit' :폼 제출 이벤트 처리, 유효성 검사 후 콜백을 실행함
- 'watch' : 지정한 필드의 값을 실시간으로 관찰하고 변경 사항에 반응함
- 'setValue' : 특정 폼 필드의 값을 설정하는데 사용
- 'getValue' : 등록된 폼 필드의 값을 가져올 때 사용
사용해보니..
처음에는 코드가 복잡하다고 생각했다.
하지만 코드를 하나하나 뜯어보니 오히려 useState로 체크박스 값을 관리하고 전체 체크되어있는지 확인하고 하는 것보다
훨씬! 간결하고 깔끔한 코드가 작성되는 것 같다
다른 팀원분은 zod로 유효성 검사도 같이 하시던데
다른 컴포넌트 만들 때 꼭 사용해봐야겠다!@@
또한 useForm말고도 공식문서에서 보면 다양한 커스텀 훅을 제공하고 있다
이또한 잘 사용해보면 좋은 코드를 작성할 수 있을 것 같다